Play Deus Ex in 2022 With Vanilla-Friendly Mods | Just do These Three Things
You only need three things to play Deus Ex on modern PCs
1. Kentie’s Launcher
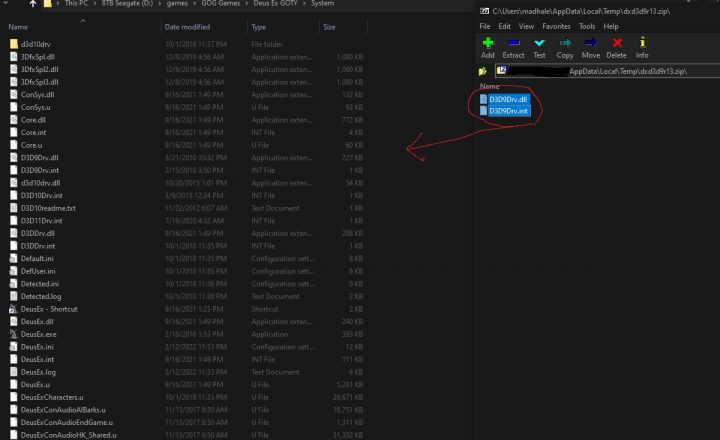
Kentie’s Launcher replaces your DeuEx.exe file with a new one.
- Download Kentie’s Deus Ex Launcher here: kentie.net/article/dxguide/
- Download required Visual Studio 2015 runtimes: vcredist_x86.exe
- Drag and drop this into your Deus EX\System directory
- Overwrite files
Note, I’m using a dark theme on Windows, so it’ll look a little different.

2. DirectX or openGL?
If you are on Windows (or are ok using DirectX on Linux) you can use the DirectX 9 settings for a moody atmosphere similar to the original game. If you want perhaps better contrast but slightly less dramatic lighting, OpenGL works well. For either you need to tweak the ini files. Here are the files:
- Direct3D9: Direct3D9 renderer version 1.3 for Deus Ex: dxd3d9r13.zip
- Open GL: Version 2.1 for Deus Ex (works with Deus Ex version 1112fm): dxglr21.zip
See all the options here: www.cwdohnal.com/utglr/
Pick your favorite version and drag and drop it into your Deus Ex\System folder (you can put them all in there and try each with the launcher):
Next, you need to tell the launcher which renderer to use. If you click on DeusEx.exe and then click on config, you will see this page:
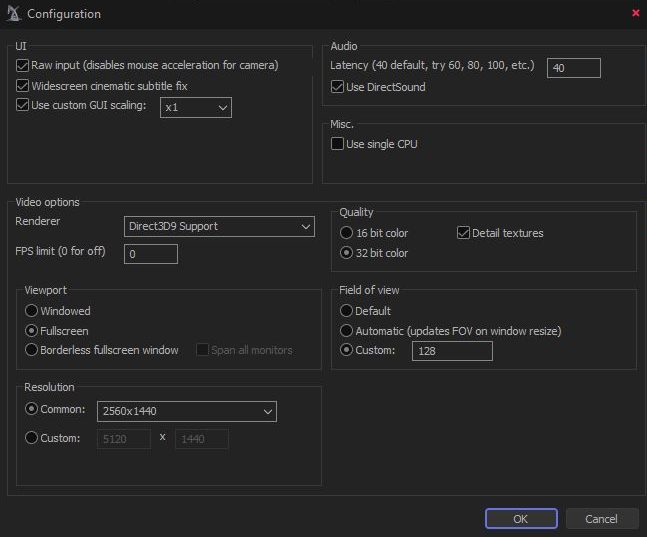
If the rendering area is blank, don’t panic. This is an easy fix:
- Close the launcher
- Right-click on DeusEx.exe and select “Create shortcut”
- Right-click the shortcut and select “Properties”
- add -localdata to the end of the “Target” field… making the line look like this (ignore my game location and just make sure the end it correct): “D:\games\GOG Games\Deus Ex GOTY\System\DeusEx.exe” -localdata”
This tells the launcher to use data in the local folder. So, when you open it again you will see all the renderers you downloaded are now listed like this:
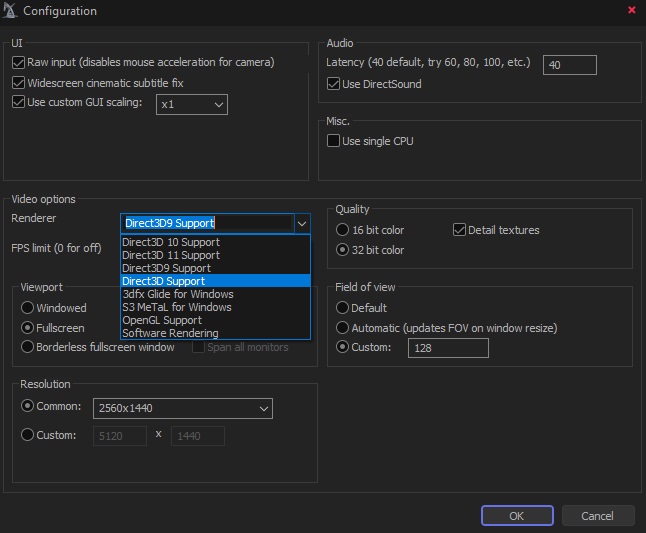
Now the only choice is Direct3D9 or openGL. I think Direct Direct3D9 works the best, performs the best, and looks like I remember the game in my mind. However, I do recommending trying openGL as well.
3. Up-sampled Textures – Deus Ex New Vision 2.0a or 1.5
New Vision 2.0a is not a re-texturing project; it’s an AI up-scaling project. every texture has been up-sampled by a factor of 4, so it will look crispier on higher res displays. It looks just like the vanilla game, just sharper. There is one catch, you need to use a DirectX 10 dll to make these textures work… and I personally hate how the game looks in DX 10 mode… but you can try it out:
- Download New Vision 2.0 here: www.moddb.com/mods/new-vision/downloads/newvision2a
- Extract the Textures folder from the zip file into your Deus Ex folder. There’s already a textures folder in there, but just let it overwrite things if need be.
For those of us who who don’t want to use DX 10 or DX 11, we can still install New Vision 1.5… but there’s a catch. These textures are custom and do not always look like the vanilla textures. So, I usually just play vanilla; you do you.
Download New Vision 1.5 here: www.moddb.com/mods/new-vision/downloads/new-vision-15
That’s all you need to install… Now, we just need to……..
Configure your damned ini file!
The ini file is in the Deus Ex\System folder; it’s simply called DeusEx.ini. Changes made in Kentie’s Deus Ex launcher will be reflected here.
In order for the game to look right using Direct3D9 OR openGL, we have to configure a few things. Scroll down until you see your rendering device. Here are my rendering settings for both. Feel free to use this as a cheat sheet, or just delete yours and copy/paste this:
| ini settings for Direct3D9 | ini settings for openGL |
[D3D9Drv.D3D9RenderDevice]DetailTextures=TrueZRangeHack=FalseNoAATiles=TrueNumAASamples=4UseAA=TrueUseSoftwareVertexProcessing=FalseUsePureDevice=TrueUseTripleBuffering=TrueMaskedTextureHack=TrueSmoothMaskedTextures=FalseSceneNodeHack=TrueFrameRateLimit=0SwapInterval=-1UseFragmentProgram=FalseTexDXT1ToDXT3=FalseDynamicTexIdRecycleLevel=100CacheStaticMaps=FalseUseTexPool=TrueUseTexIdPool=TrueUseSSE2=TrueUseSSE=TrueSinglePassDetail=FalseSinglePassFog=TrueColorizeDetailTextures=FalseDetailClipping=FalseDetailMax=2RefreshRate=0MaxTMUnits=0NoFiltering=FalseMaxAnisotropy=16Use565Textures=FalseUse16BitTextures=FalseUseS3TC=FalseUseTrilinear=FalseUsePrecache=FalseUseMultiTexture=TrueMaxLogTextureSize=8MinLogTextureSize=0OneXBlending=TrueGammaCorrectScreenshots=FalseGammaOffsetBlue=0.000000GammaOffsetGreen=0.000000GammaOffsetRed=0.000000GammaOffset=0.000000LODBias=0.000000DescFlags=0Description=HighDetailActors=TrueCoronas=FalseShinySurfaces=TrueVolumetricLighting=True |
[OpenGLDrv.OpenGLRenderDevice]Translucency=TrueVolumetricLighting=TrueShinySurfaces=TrueCoronas=TrueHighDetailActors=TrueDetailTextures=TrueUseTNT=1MinDepthBits=16MaxLogUOverV=8MaxLogVOverU=8UseMultiTexture=1UsePalette=0UseAlphaPalette=0ShareLists=0AlwaysMipmap=0DoPrecache=0UseTrilinear=FalseMaxAnisotropy=16SupportsLazyTextures=0ZRangeHack=FalseNoAATiles=TrueNumAASamples=4UseAA=FalseMaskedTextureHack=TrueSmoothMaskedTextures=FalseSceneNodeHack=TrueFrameRateLimit=0SwapInterval=-1UseFragmentProgram=FalseUseVertexProgram=FalseUseCVA=FalseUseMultiDrawArrays=FalseTexDXT1ToDXT3=FalseDynamicTexIdRecycleLevel=100CacheStaticMaps=TrueUseTexPool=TrueUseTexIdPool=TrueUseSSE2=TrueUseSSE=TrueBufferTileQuads=FalseSinglePassDetail=FalseSinglePassFog=TrueColorizeDetailTextures=FalseDetailClipping=FalseDetailMax=0RefreshRate=120MaxTMUnits=0NoFiltering=FalseUse16BitTextures=FalseUseS3TC=FalseUsePrecache=FalseUseBGRATextures=TrueUseZTrick=FalseMaxLogTextureSize=8MinLogTextureSize=0OneXBlending=TrueGammaCorrectScreenshots=FalseGammaOffsetBlue=0.000000GammaOffsetGreen=0.000000GammaOffsetRed=0.000000GammaOffset=0.000000LODBias=0.000000DescFlags=0Description= |
That’s it. It should work now.
IMPORTANT NOTES:
- Brightness can ONLY be controlled in fullscreen mode if you are using Direct3D9 mode.
- If using openGL, you MUST make sure “UsePalette=” is set to 0, otherwise the game will be insanely dark. Again, make sure it says: UsePalette=0
Enjoy playing the best game ever.
Check out these products on our store:
epicpants.com/product-tag/deus-ex/